Showing posts with label hints. Show all posts

Monday, May 16, 2022

Starting & Finishing Cabled Motifs

I was recently contacted by a lovely knitter who was puzzled about knitting my hat pattern, Anchors & Ropes. I was able to help her through email but it occurred to me that others might find a little photo-tutorial a useful thing when knitting the anchors. And there'll be a knotwork motif in my Countess Cathleen that you haven't seen as yet. Considering I've only just recently finished knitting the hood ;)

I learned to knit knotwork cabled motifs from Alice Starmore's brilliant books "The Celtic Collection" and "Aran Knitting". And while the anchor in my Anchors & Ropes hat came from a stitch dictionary published in around 2005 (I knit the original Anchors & Ropes hat in the fall of 2009), it uses pretty well the same method put forward by AS. This has continued to be the way I start, and end, motifs that need this rounded shaping.

Enough background! Let's jump into how to start a motif.

I'm working with worsted weight yarn on size 4.5mm (US7) needles for both sections of this tutorial. The knotwork shown is a swatch for my Countess Cathleen pattern; the final pattern may not look the same. I haven't decided which of my knot motifs I like best. I've only created five possibilities for this design ;) 

(For knitting in rounds, you'll need to knit where it says purl in steps 3 and 4 of the starting a motif section.)

Starting a motif:

Step 1:
Work to where the pattern says to start your motif.

Step 2:
In the next stitch, you'll work 3 stitches. First by knitting into the back and then the front of the stitch:

Then by knitting into the vertical line that sits on top of those  2 stitches:

Here's the 3 sts completed:

Step 3:
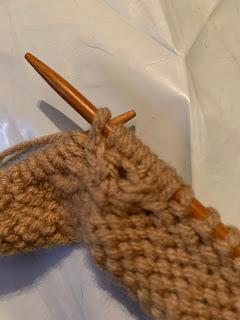
In the next row, purl the first new stitch, work (purl, yarnover, purl) into the second new stitch, and purl the third new stitch:

Step 4:
On the next row, work the stitches as the pattern tells you, remembering to purl the yarnover through its back loop to twist it and avoid a hole:


And there you have two 2-stitch strands to work your cables from. The anchor motif I used in Anchors & Ropes has a pair of additional increases on either side of the first 1-into-3 stitch, which are knit on the next round; the anchor's arms are made of 3 stitches rather than 2. A slight variation that shouldn't cause you any pause.

Ok, now how do you close up those stitches that you've added into the fabric of your knitting? You could decrease them away over a few rows, but if you're working a knotwork motif it won't resemble the beginning.

Ending your motif:

Step 1:
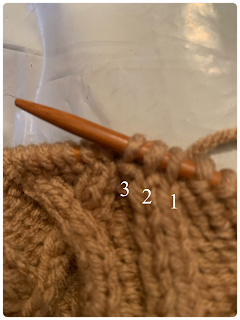
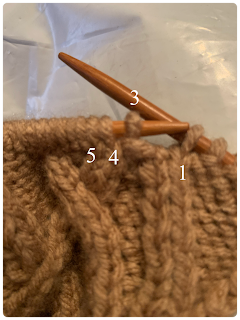
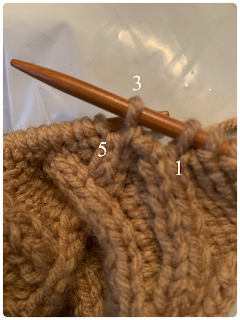
Look at the stitches of your motif; you have 5 needing to be reduced down to 1. I've numbered them for you in this photo:
Note that stitch 3 is a purl stitch between the two pairs of stitches that have been the strands in your motif. 
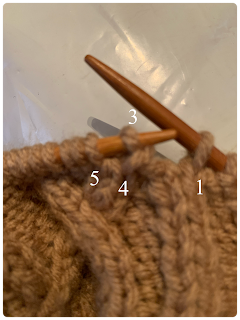
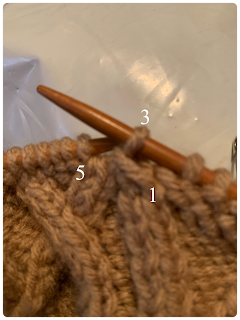
Step 2:
Slip stitches 1, 2, and 3 to the right needle, purlwise (don't twist stitch 3 throughout this process):
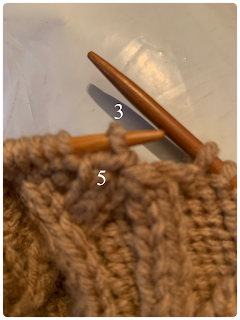
Step 3:
Lift stitch 2 up and over stitch 3, letting it drop off the needle as if you cast it off:

Step 4:
Slip stitch 3 back to the left needle:

Step 5:
Lift stitch 4 up and over stitch 3, letting it drop off the needle:

Step 6:
Slip stitch 3 back to the right needle:

Step 7:
Lift stitch 1 up and over stitch 3, letting it drop off the needle:

Step 8:
Slip stitch 3 back to the left needle:

Step 9:
Lift stitch 5 up and over stitch 3, letting it drop off the needle:

Step 10:
Purl stitch 3:


Ta-da! Your decrease is complete, and the top of your motif has a similar rounded shape to the bottom of it.

If your motif has more stitches per strand, alternate passing stitches over the center stitch until all of the strand stitches are gone.

I hope this helps you with the start and end of these types of cabled motifs! They're so much fun to knit :)

Yours in yarn and woolly knotwork motifs,
SĂ­le


Friday, February 18, 2022

Beginning of the End

I've started casting off my Hornpipe Bag today! :)

For those of you just joining in, my Hornpipe Bag is a double-knit drawstring bag, worked from the bottom up. I'm knitting it in Bernat Sox in the "Rainbow" coloway and Patons Kroy in the "Coal" colorway. It features a knotwork motif on the bottom and which is repeated four times around the sides on alternating backgrounds. 

As with all double-knits it takes longer than you originally think. You're literally making both sides of a two sided fabric at the same time; twice the number of stitches as appear on either side. Not quite twice the time to knit but it does add extra time to the process. Of course I have the added issue of having several projects on the go at once; some designs of my own, others by other designers that I want the item or it's perfect as a gift for the knit/yarn worthy in my life. I counted 10 works in progress last week, 6 being my own designs. Ah, the glamorous life of an independent knitting pattern designer ;)

If you're not familiar with double-knitting, I wrote a bit of an overview last year heređź”— on this blog, and I also recommend checking out Alasdair Post-Quinn's site (link in the side menu), Fallingblox Designs.

I'm using a bit of a different cast-off method with my bag, and I thought it would be fun to give a bit of a breakdown here for future reference. This cast-off looks decorative which makes it nice for the top of a bag, or really anywhere you'll be seeing the cast-off a lot, like a scarf end.

For the explanation below instead of alt-captioning the photos, I'll be describing them in detail below each photo for everyone. That way if I need more characters and/or words to describe things it won't be cut off.

So to start, this is a photo of what the first 8 or so stitch-pairs look like cast-off:

What's going on? The first section of my bag has a black background of stockinette on the outside, and all of my stitch-pairs are black/multicolored, a black knit stitch and a multicolored purl stitch. In the photo there are multicolored "blips" near the top edge, and a black stitch with a yellow one  collared with it. The collar is the last cast-off stitch. 

Let's back up just a tick. When double-knitting in the basic way with two colors your background will be one color on one side and the other color on the opposite side. Whichever color you knit with, you purl the other stitch of the pair with the other. So here I've been knitting with black and purling with the multicolored yarn for my background. The stitches alternate in the needle, black, multi, black, multi, etc.

Ok, now to work the cast-off. I'm using both yarns as one for the entire cast-off. Knit the first stitch, and purl the second. Now lift the first double stranded stitch over the second and off the needle; this is the usual movements for casting off that you're probably very familiar with. But with double-knitting you have twice the number of stitches and it could splay. (Which come to think of it, would be an interesting way to the shape the bottom of a cowl. I digress!)

What I'm doing on this bag (and other projects in double-knitting) is reducing the stitches to one side's worth and casting-off at the same time.

Ok, we've got one double-stranded stitch on the right needle, originating from one knit and one purl stitches. This is the point the above photo is at. 


Work the next pair of stitches the exact same way: knit one with the double strand, and purl one with the double strand. You have three double stranded stitches on the right needle now; right to left: the combined stitch from the previous stitch-pair, a knit stitch and a purl stitch. First you need to create a second combined stitch by lifting the knit stitch over the purl stitch...


... which leaves two double stranded combined stitches on the right needle. Next we cast-off the first combined stitch by lifting it over the second combined stitch...


... returning us to having one double stranded stitch on the right needle. From here we continue the process set out: knit, purl, reduce to one stitch, cast-off the first reduced stitch on the needle.

Using both colors of yarn leaves a neat sort of braided pattern to the top of the cast-off edge:


I think this a great decorative detail and it happens naturally, no extra work. Always a bonus! 

That's where I'm at with the Hornpipe Bag this evening. Once the cast-off is finished, I can start the drawstrings. Let's here it for i-cord! ;)

Yours in yarn and decorative edging,
SĂ­le


Monday, September 7, 2020

Joining

 I finished knitting the second hexagon for my pillow project last night. Here's how it turned out:
White background with blue leaves and vines pattern

I like that the two charts I chose are different from each other; chart D is predominantly blue, while you can see chart E is predominantly white. 

I've chosen to use an i-cord edge to join the two sides together; I have just over two sections done so a bit more than 1/3 the way around. I'm doing the edge in blue; white on the edges would look gungy too quickly, I think. 

The final two rounds on both sides were knit with white and I'm employing a little trick to keep from having white blips happening, as you can see in the next two photos (one from each side):
close up: blue i-cord edging applied to predominantly blue side of pillow

close up: i-cord edging applied to predominantly white side of pillow

What's my secret? Purling the side away from me. 

Ok, so I'm working a 3 stitch i-cord to join two pieces together. The two pieces are on their own holder needles. I cast-on 3 stitches onto the "front side" needle; that is the side facing me. I'm applying the i-cord with the predominantly white side facing me. Using a dpn (double-pointed needle), I knit 2 sts (of the i-cord), then I slip the next st as if to purl. Next I slip the first pillow stitch from the front needle, also purlwise. Now I purl the first stitch from the back needle, pass the slipped pillow stitch over the purled one and off the needle, then pass the i-cord stitch over the purled on and off the needle. There are 3 stitches on the dpn and I slip these back onto the front needle and continue on.

More conventionally written, it looks like this:
*K2, sl 2 pwise from front needle, P1 from back needle, p2sso, transfer 3 sts on dpn back to front needle; rep from *...

Amazing how a little thing like purling a stitch instead of knitting it makes for a cleaner look.

I want to get this joining (and stuffing once 5.5 of the 6 sections are joined) finished this evening, so this is where I'll leave you.

Yours in yarn and i-cord,
SĂ­le