
Or at least in my cloak's edging!
As I'm working on my Countess Cathleen design, I've been knitting a lot of star stitch. And that got me thinking a little photo-tutorial on it might be useful for those of you not familiar with it.
To start off, star stitch is much like Trinity, blackberry or bramble stitches. You're knitting a series of clusters of 3 stitches together to make a decorative filler that is often paired with cables. Star stitch isn't as commonly paired with cables as the others are, which is part of why I was drawn to it for this pattern. I also like that instead of forming knots or near bobbles, star stitch lies flat while still having texture. Here is a photo of star stitch:

This is actually the start of the hood; 13 stitches provisionally cast-on and worked for a certain number of rows, followed by placing the active stitches on hold and picking up along the left side of the panel to start the cable panel. I digress; you're here for a star stitch tutorial, not my blathering lol
As you can see star stitch involves clusters of stitches. The stitch pattern can be worked on any multiple of 4 stitches + 1. As I said before I worked this panel over 13 stitches. Star stitch is worked on the wrong side rows and you're purling the stitches together or singly.
Step 1

Step 2

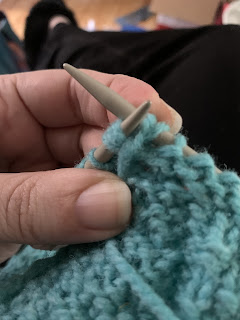
Insert the right needle purlwise into the next 3 stitches...
Step 3

Step 4
 make a purlwise yarnover by bringing the yarn up and over the right needle and back through between the needles. The yarn is ready for the next step and you have 2 new stitches on the right needle.

Step 5

Insert the right needle back into the original 3 stitches...
Step 6

Step 7

... and slip the stitches from the needle. That's your first star completed.
Continuing the row
(Purl 1, repeat steps 2 through 7 for another star) repeat these stitches until you reach the last 3 stitches of your row: Purl 3.
Here's what it looks like from the right side at the finish of the row:

The next row (right side)

Knit across the row.
To continue the panel
Next wrong side row: (Purl 1, repeat steps 2 through 7 for a star) repeat these stitches to the last stitch of the panel: Purl 1.
All right side rows: Knit all the stitches.
And that's how to work a panel of star stitch. I hope you've found this useful!